Showing posts with label reusable. Show all posts

Tuesday, December 13, 2022

Kill Two Birds with One Swedish Dishcloth

It's rare I go to the office these days, but I go in the other day to meet up with some folks. I step into the elevator and there's a poster advertising a holiday market. Yay! Now I have something fun to check out over lunch. :) 

I grab a couple co-workers and we check out the booths. Some have gorgeous handmade ceramics (my coworker B got a lovely mug to go with her new teapot). Some have lovely handmade soaps or candles. Another booth had reusable glass straws, and my coworker R got one of those...

I come across a booth that had a variety of awesome eco-friendly housewares, from washable bowl covers to adorable wool dryer balls that looked like owls. Scanning the booth, my eye lands on these items with a cute patterns labeled "Wishcloth". The booth attendee explains: "They're greeting cards. But also Swedish Dishcloths."

You may be familiar with other types of eco-friendly greeting cards, such as those made with seeded paper, so you can plant the card when you're done and it becomes wildflowers. But this concept was totally new to me and so unique. 

If you're not familiar with Swedish dishcloths, they are a super soft, spongy, durable cellulose towel, that can replace your sponges and paper towels. Per Brightly, "With just one of these, you get the same use you would out of 17 rolls of paper towels." And when you are done with them, because they are made of natural fibers, they can be composted. So not only is this card a card, but it's also a great little kitchen gift.

Look at the cute prints they come in, such as holiday llama: 

Or "You Make the World a Better Place" (awwww):


They are slightly bigger than other Swedish dishcloths, because they are folded, so you can write your message on the inside. 

At $7.99 each, these unique cards are about the average price I'm seeing for standard greeting cards these days, or you can get a substantial discount with a 3-pack or 6-pack. Brightly also sells many other products on their website, as well as offering getting started guides, tips and tricks, and other advice, so please browse around!


Wednesday, March 18, 2020

Earth-Friendly Ears

Whether you call them cotton swabs, cotton buds, or Q-Tips, you likely have a few uses for these sticks around your bathroom. For me, it's drying my ears or removing the last traces of eye makeup after a shower.


After seeing this devastating image of seahorse dragging around a Q-tip floating around the web, I wanted to prioritize swapping these out.


They may also be the next item to gain attention from governments, after grocery bags and plastic straws. Scotland has already banned plastic cotton buds, while the EU is looking at single use plastics in general.

Plastic, you say? Check your medicine cabinet and see if yours have a cardboard or plastic stem. If they aren't paper-based, that's the first easiest upgrade.

The next-level upgrade is to look at reusable options: for ear-cleaning they make them in durable plastic, metal, and wood. All are washable. I tested a couple out and wanted to share my results.

I first tried these Utility Tip ear cleaners, professing to be "ultra soft", because I was not sold on putting plastic into my ear instead of soft cotton. I was right to be nervous. After a few tries, I couldn't handle these, which felt like they were scraping me. However, I had a couple friends swearing by similar products, so I decided to give another brand a try.


Next up was ClĂ­nere. These are a bit better. Not only was the fin side substantially softer than the Utility Tip ones, but it also has a scoop side for if you have a wax issue. They still don't give me the same super dry satisfaction of cotton, but reduce post-shower water by about 80%.


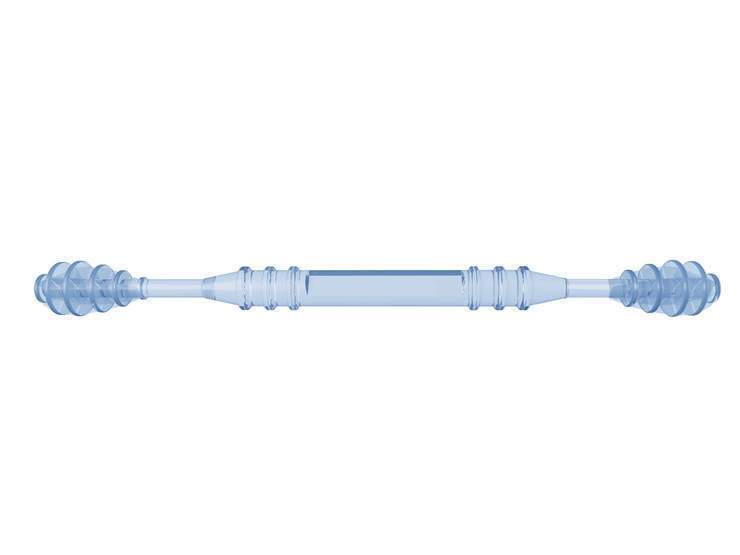
Finally, I tried Last Swab. I first learned about them through their Kickstarter, and decided they would be my last ditch effort to finding a really comfortable reusable swab. Instead of plastic, they are made from silicone, and have a couple different designs: a regular round tip with bumps for giving your ears a good scrub, and a smooth pointed tip for makeup use. These were by far the most comfortable for ear use. It would be a fantastic tool for earwax removal and a decent tool for water removal. For makeup use... because it's smooth and not absorbent, it does nothing for makeup removal. I imagine it would be a great choice for blending makeup.


Having decided that none of these gave me the super dry feeling of cotton, I tried one last thing: an old t-shirt. I've been using cut up t-shirts for a few other applications: as hankies, as makeup remover pads, so I have plenty around. Simply wrap it around a finger and go for it. Viola! Not only did my ears get nice and dry, but it's probably the only doctor-approved method listed here. The used t-shirt squares are collected in a mesh lingerie bag, and then washed with my regular laundry.

In summary, after lots of experimenting, I will likely use t-shirts for ear drying and makeup removal, and Last Swab for wax removal.

T-shirts: FREE
Last Swab: $12, pay back after 4 boxes or 2000 Q-Tips

Q-Tips with cardboard stem: $3.29 for 500 at Target
Generic swabs with cardboard stem: $1.99 for 500 at Target
Generic swabs with plastic stem: $1.99 for 300 at Walgreens

(You can break even or even save $$ with the switch to cardboard!)


Sunday, January 5, 2020

Mind Your Bee's Wax

My friend, Tatiana, has been super supportive of my goals to reduce waste, and got me this sweet DIY Beeswax Wrap kit as a holiday gift! Don't know about wax wraps? They are basically wax coated fabric, that can replace cling wrap, and can be reused for months before refreshing.


The kit contains everything I need to make 3 assorted size wraps: fabric in a fun pattern, directions, parchment paper, 3 pieces of wax, a glass jar, and a paintbrush.


First, preheat your oven to 200℉ while you complete the first few steps.

Lay the fabric on a piece of the parchment paper on a cookie sheet. (I ended up using the same piece of parchment for all 3 wraps, and keeping the other sheets for future projects.)


Next, create a double boiler situation by setting the mason jar inside a pan of boiling water. Melt the beeswax in the jar.


Use the melted wax to paint a thin layer over all your fabric. Don't worry if it's perfect or starts to get chunky.


Next, put the cookie sheet with fabric into your pre-heated oven for 1-2 minutes. This helps melt the wax further, so its spreads evenly over the fabric.

Then remove the cookie sheet, and carefully pick the fabric up by the corners, and wave it in the air for about 30 seconds. This will quickly cool the wax until the fabric stiffens.


Finally, test out your new wrap! Simply wrap it around the food you want to package, or bowl you want to cover. The warmth of your hands should soften the wax enough so that the fabric molds into shape. Exhibit A: wrapped orange.


In between uses, you can wash your wrap in cool water with dish soap. You should be able to use the wrap many times before it starts to lose its effectiveness. Then, simply repeat the waxing process.

Not feeling crafty? Get a ready-made wax wrap, like this set of 3 for $18 from Sur La Table.

Have your own fabric but need wax? Get it for about $1.50 per wrap, available online or at craft stores.

Pat yourself on the back for reducing your use of cling wrap and having super cute lunches. :)

Saturday, January 26, 2019

Are you in the Loop?

GUYS, I'M SO EXCITED!!!

I've talked about buying from the bulk bins before, but sadly, there are limited stores in my neighborhood, and not all the products I want. I really just want to refill my giant conditioner bottle with my favorite popular brand in a super convenient way.

Enter Terracycle. Terracycle is known for its "brigades", partnerships with large brands to recycle their not traditionally easy to recycle packaging (think Nescafe capsules or Colgate toothpaste tubes). Terracycle is now partnering with some of these same large consumer brands for a new program called Loop.

Loop was just announced this week at the World Economic Forum, and is making huge waves. Just Google "Terracycle Loop" for dozens of articles ranging from major news and business publications to smaller green magazines.

Loop takes a different approach: instead of recycling packaging, it will use the old milkman model. Deliver goods in a reusable packaging, then take the packaging back for cleaning and reuse. Loop already has multiple popular brands lined up, like Dove, Cascade, Haagen Dazs, and Seventh Generation. This promises the products I already love, with the convenience of delivery, and no more guilt from single-use packaging. Look at these gorgeous, reusable metal bottles with pumps.

(image borrowed from loopstore.com)

They are getting started in New York and Paris, but... you can sign up here now to show your interest. Let's flood them with interest, so we can be in their next market!

Let's close the loop with Loop!

Sunday, December 16, 2018

Waste Free Gift Wrap #2 - Gift Bags

With the holidays approaching, let's talk gift wrap: Each year, billions of dollars are spent on wrapping paper in the US alone, with millions of pounds of wrapping paper usually used once. Holy cow!

In February, I showed one alternate way to wrap presents, by wrapping the gift with another, such as a tea towel or scarf.

In this post, I'll share another: fabric gift bags. Gift bags are pretty easy to make. They are essentially tote bags, made in a variety of sizes. Last year, I got a bunch of holiday fabric by the yard at Seattle Recreative. You could also work with curtains, tablecloths, etc, from a thrift store near you. Not only are you up-cycling the fabric, but you are also creating wrapping that can be used over and over again for years to come. By using thrifted fabric, the cost comes to about $3/bag, about the same cost as a new paper gift bag.

1. Cut out the 4 sides of your bag, slightly larger than your gift. Add a few inches of length, which will be used to create the bottom of the bag. If your fabric is thinner, might fray, or you just want a contrast lining, cut out 8 sides (you'll be making two bags, outer and lining).


2. Sew the four panels together, with the pattern on the inside. 


3. Sew the bottom shut. Note: For this bag, all my sides are equal width. Check the placement of my seams when I go to sew the bottom. Two of the sides are folded in half; this is important for making the flat bottom of the bag. If your bag is rectangular instead of square, make the shorter sides the halved sides. 


4. Sew perpendicular across the bottom seam on the two corners, resulting in two isosceles triangle points. This triangle should happen naturally when you flatten the sides of the bag. 


5. When you flip the bag right side out, those triangles formed the squared base of the bag.


6. To make handles, sew strips of complimentary fabric into a tube, and then flip right side out. These can be any width you like, but keep in mind if you can't fit your finger inside, you will have a very difficult time flipping them right side out. 


7. Put your lining bag inside your outer bag. Fold the rough top edges inside, place your handles, and pin together to hold everything in place which you sew this top seam.


8. Once you've trimmed any long threads, you are now ready to fill your bag with gifts! Want reusable tissue too? Use complimentary fabric squares.


Not crafty, or running out of time? You can purchase reusable gift bags from many places:
From TheRubySwan on Etsy - ribbon closure means no tissue needed!
From Cohasset Party Supply on Etsy
From Appleby Lane on Amazon
From Illumen on Amazon
From The Container Store

The example bags above average $6, meaning payback after just a few uses.

Happy Holidays!

Sunday, April 8, 2018

Baby Steps at the Office

I'm pretty dang proud of my company's efforts. They are hosting a series of events over a couple weeks this month (one at each building) where employees can decorate a reuseable mug, and socialize the idea of not using the paper cups available in the kitchens. With over 40,000 employees at our downtown Seattle campus, these are the types of efforts that can really add up! 


Some of our satellite offices don't have disposable cups at all, and each employee must bring their own mug to the kitchen. I'm not sure how realistic that is at our HQ offices, because we have a large quantity of visitors, but this is a really good first step.

With Earth Day this month, is your office doing anything to encourage good employee habits?