Sunday, November 22, 2020

Concentrated Conditioner

Previously, I wrote about how concentrates are an eco-friendly way to move product. With all the water removed, you save lot of weight and space, and therefore need way less trips to ship more product.

I've been struggling to want to change my hair conditioner though. I have dry hair and love to use several pumps of rich, creamy lotion-like product. So while several of my low-waste social groups tout the benefits of bar-form hair products, I was hesitant to make the switch. 

Last year, I learned about a company, HiBar, that was getting rave reviews and decided to give it a try.


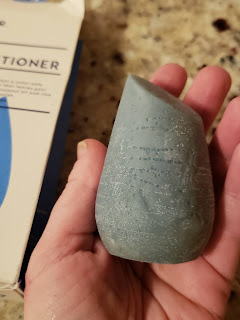
The packaging is plastic-free, and it has a pleasant, light citrusy fragrance, but I'm skeptical this small bar is worth $14. 


When I tried it, I was struggling to figure out how to really use it. Can I get a lather on my hands like with bar soap? Do I rub it on my head? I tried both, and ultimately just didn't get as much product off the bar as I wanted. Though the product that did come off was great: rich oils and left my hair feeling smooth. So how can I get the experience I'm missing from a cream conditioner? I posed my question by my social groups, and the answer came back unanimous: it's easy to reconstitute it!

(And did you know? You can do this for any of your solid bath and body bars. Prefer body wash or liquid hand soap? Reconstitute your bar of soap!)
 
Step 1: Grate the bar with the large holes on a cheese grater. This was surprisingly easy, with the bar shredding easier than a medium cheddar.

You're left with a sizable pile of shavings.

Step 2: Pour the shavings into a large bottle. HiBar says this conditioner is as good as at least 16 ounces of regular conditioner, so I'm going for a 16+ ounce bottle. My last bottle of drugstore conditioner will do: it's 28 ounces and has an awesome pump. You want to pour the shavings in, not the finished product, because it will be that thick and creamy.

Step 3: Pour in hot water. It doesn't need to be boiling, but as hot as your tap will go. I'm starting with 16 ounces to see if HiBar delivers on its promise, but ultimately end up filling the entire 28 ounce bottle.

Step 4: Close up the bottle, give it a shake, and let it it sit for about 10 minutes. The hot water will do its job to melt down the shavings and reconstitute into a lotion. Then, compare it to your drugstore conditioner. The first picture of the yellow conditioner is my old L'Oreal conditioner, whose creaminess I wanted to match.

This second picture of blue conditioner is the HiBar. Creaminess achieved! And we exceeded HiBar's estimation that we would get 16 ounces of value - we got 28!

So now to discuss pricing. I only pay $7 for the L'Oreal conditioner. Even though I got more than expected from HiBar, is it worth the $14? It's really a false comparison to go on volume alone. HiBar boasts: "No sulfates, parabens, silicone, phthalates, and no cruelty." Compare to brands with similiar qualities, like Pacifica (8 oz conditioner for $10) or Aveda (8.5 oz conditioner for $19), and you get substantial cost savings.

Overall, I'm happy that I found a solution to conditioner that's easy on the planet, and luscious for my hair.

Monday, November 9, 2020

Saving for Scratching

Last year, we got crafty with our toilet paper and paper towel cardboard cores, creating festive holiday ornaments. However, I only needed so many decorations, and there's a endless renewing supply of cardboard cores, so I needed some more ideas. 

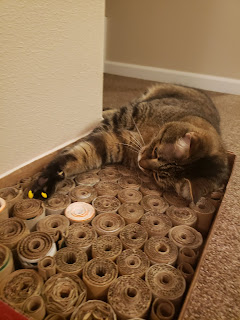
Enter my sweet kitty Toby, who at 10 years old, has kitten energy and uses multiple scratching toys. Exhibit A, this cardboard scratcher that goes for $9.99 at PetSmart. 


This type of toy was the right option to use up LOTS of cardboard, so let the DIY games begin!

Step 1: Cut the TP rolls in half. Thinner rolls can be flattened and cut with scissors, while thicker cores can be cut with a utility knife.
 

Step 2: Cut up the side of the roll so you have a strip of cardboard, and roll it up into a tight spiral. I rolled it around a pencil to get the spiral started. (You can use any scrap cardboard. Here I'm using coffee sleeves too!)

Step 3: Choose a box that will act as a frame for your scratching board. I used a flat box that held our groceries from Costco. How appropriate that the coffee addicts in our house brought home a Coffee-mate box. :) Start filling the box with rolls. Some rolls you'll leave uncut, as tubes, while the rest will be curled up inside the uncut rolls. Let your cat inspect at various progress points to make sure you are doing it to his satisfaction.


Tip: if you are using scrap corrugated cardboard, check which direction you are cutting. Cutting against the ridges will give you a pocketed appearance, like the roll on the left. Cutting with the ridges will give you the layered look, like the roll on the right. Feel free to alternate, and see what textures your kitty enjoys digging their nails into.
 
Step 4: Once you have enough tightly-filled tubes to fill the box, use some hot glue to secure the tubes to the base of the box.
 
 
Step 5: Close any remaining gaps with a few little spirals. 
 

Step 6: Salt bae on some catnip. Your kitty deserves the best "seasoning".

Step 7: Observe your kitty enjoying his new toy. It may have saved you $10 at the store, but you invested many hours of love, rolling cardboard, and he can tell!

Is it a scratcher, or a throne?

Definitely a scratcher.

Or maybe a lounging scratcher.


Monday, November 2, 2020

Another DIY Halloween

Another Halloween, another round of thrifting and/or DIY'ing (from second-hand materials!) my costume. Even with COVID this year, I figured there would be an opportunity for some festivity, and Halloween did not disappoint! For work, I was able to dress up for a virtual happy hour with one group of colleagues, and a virtual team trivia event for another. And for the weekend, Tatiana and I swapped our usual late night people-watching for an outdoor coffee.

In August, I teased you with this arrival from Poshmark. 

And in September, I hinted at more to come, with Toby guarding this stash of second hand fabric, I acquired from Value Village. 


Straight to the punchline, I went as the famous palindrome meme: Tacocat! Pairing a super cozy kitty onesie with a DIY taco cover, this costume is warm enough for a chilly northwest October.
 

Now the how-to: Starting with a pair of red place mats, I painted some details with acrylic paint and fabric medium, then cut out the desired half-circle shape to create a couple slices of tomato.

This pic shows a few steps: I cut the yellow felt into a large enough circle to wrap around me, creating the taco shell, and sponge painted some brown and lighter yellow spots, for a toasted corn tortilla texture. I cut a smaller circle out of the top center, creating a arm hole. Next, to create the "lettuce", I sewed the ruffled border of a green tablecloth around the perimeter. A loop of lettuce creates a shoulder strap for my other shoulder. Pictured here are some adhesives and velcro strips; the velcro was great for fitting the costume, but ultimately not strong enough for a costume I wanted to be able to sit and stand in. I replaced the velcro strips with ribbons.

Next, secure the tomato slices to one side of the taco shell, sewing the slices right behind the lettuce.

Use velcro or ribbons to fasten the other side of the tomatoes to the other side of the shell.


Put the final look together, and... tacocat! First pic is me in costume, followed by the a version of the meme. Nailed it!

Not only is it a ton of fun to put these costumes together, but it also saves $$$ and new materials from one-time use. This pre-fab taco costume was found at Target for $30, while the second-hand fabrics were just $8 at Value Village. The cat onesie ran $25 new at Target last year, and cost $9 like new at Poshmark.


Total cost: $17

Compare at: $55 new

And, did I mention the cat onesie has pockets? It may become my winter go-to outfit!