Sunday, April 24, 2022

From Scraps to Soup

If you haven't spent a lot of time in the seafood aisle of the grocery store, there are a few ways to buy shrimp: whole (you may need to remove head and vein), EZ Peel (head and vein removed), or fully peeled and tail removed. The less prepared they are, the cheaper they are, but the more work for you. I love the EZ Peel as a good middle ground. In order to remove the vein, they slice the shell the whole length of the shrimp, giving you a super easy place to start peeling (hence, EZ Peel). This leaves minimal effort to prep the shrimp and can save you $1-2/pound.


Not only do you save a few bucks, but now you have this resource which is rich in minerals and vitamins as well as flavor. Take the shells (legs, tails, and all) and put them in a container in your freezer to accumulate and not have your fridge smell fishy until you are ready to use.

 
Now it's time to use up those shells. (Note: you're about to stink up your kitchen, so open a window!) I'm combining a few recipes for corn broth and shrimp stock, including one that used both for a chowder base. In addition to shrimp shells (from 1lb shrimp), I saved 6 half corn cobs and shells from 2 leg sections of snow crabs. 
 

Dump those, and enough water to cover, in a large soup pot. I love these large Pyrex measuring cups for if you want more precision. One of the recipes called for 9 cups of water, and since I was using a lot of base ingredients, I upped that to 12.


Next add, some veggies, onion and celery for depth of flavor. You can use scraps for these too. Most veggie broth recipes call for using onion skins and the tops you would generally cut off. Your celery can 100% be a wilted stalk, a great way to clean out the fridge. (Side note: wilted celery can also be revived but storing in cold water. The wilting is due to water loss, and it will perk back up.)


Add all of this to the soup pot, along with a couple bay leaves and some whole peppercorns. Bring to a boil, reduce to low, cover and simmer for 1 hour.


It's that easy! Strain out all the solids (now you can compost those), and once it's cooled, portion and freeze what you won't use within a few days. I was super pleased after a taste test that this broth had a rich flavor with none of the bitterness I experienced with my first attempts at veggie broth.

Now what to do with this super flavorful broth? Keep in mind that both seafood and corn are a bit sweet, so while you can use this anywhere you would normally use broth, it will work better for things that can tolerate some sweetness. 

For both corn broth, shrimp broth, or combo like I made, it was recommended to use a base for soups or chowders.
 
For straight corn broth, it was suggested to make grits. 

I'm foreseeing some decadent risotto in my near future!

Thursday, April 14, 2022

Secondhand Steals and Conscious Comfort

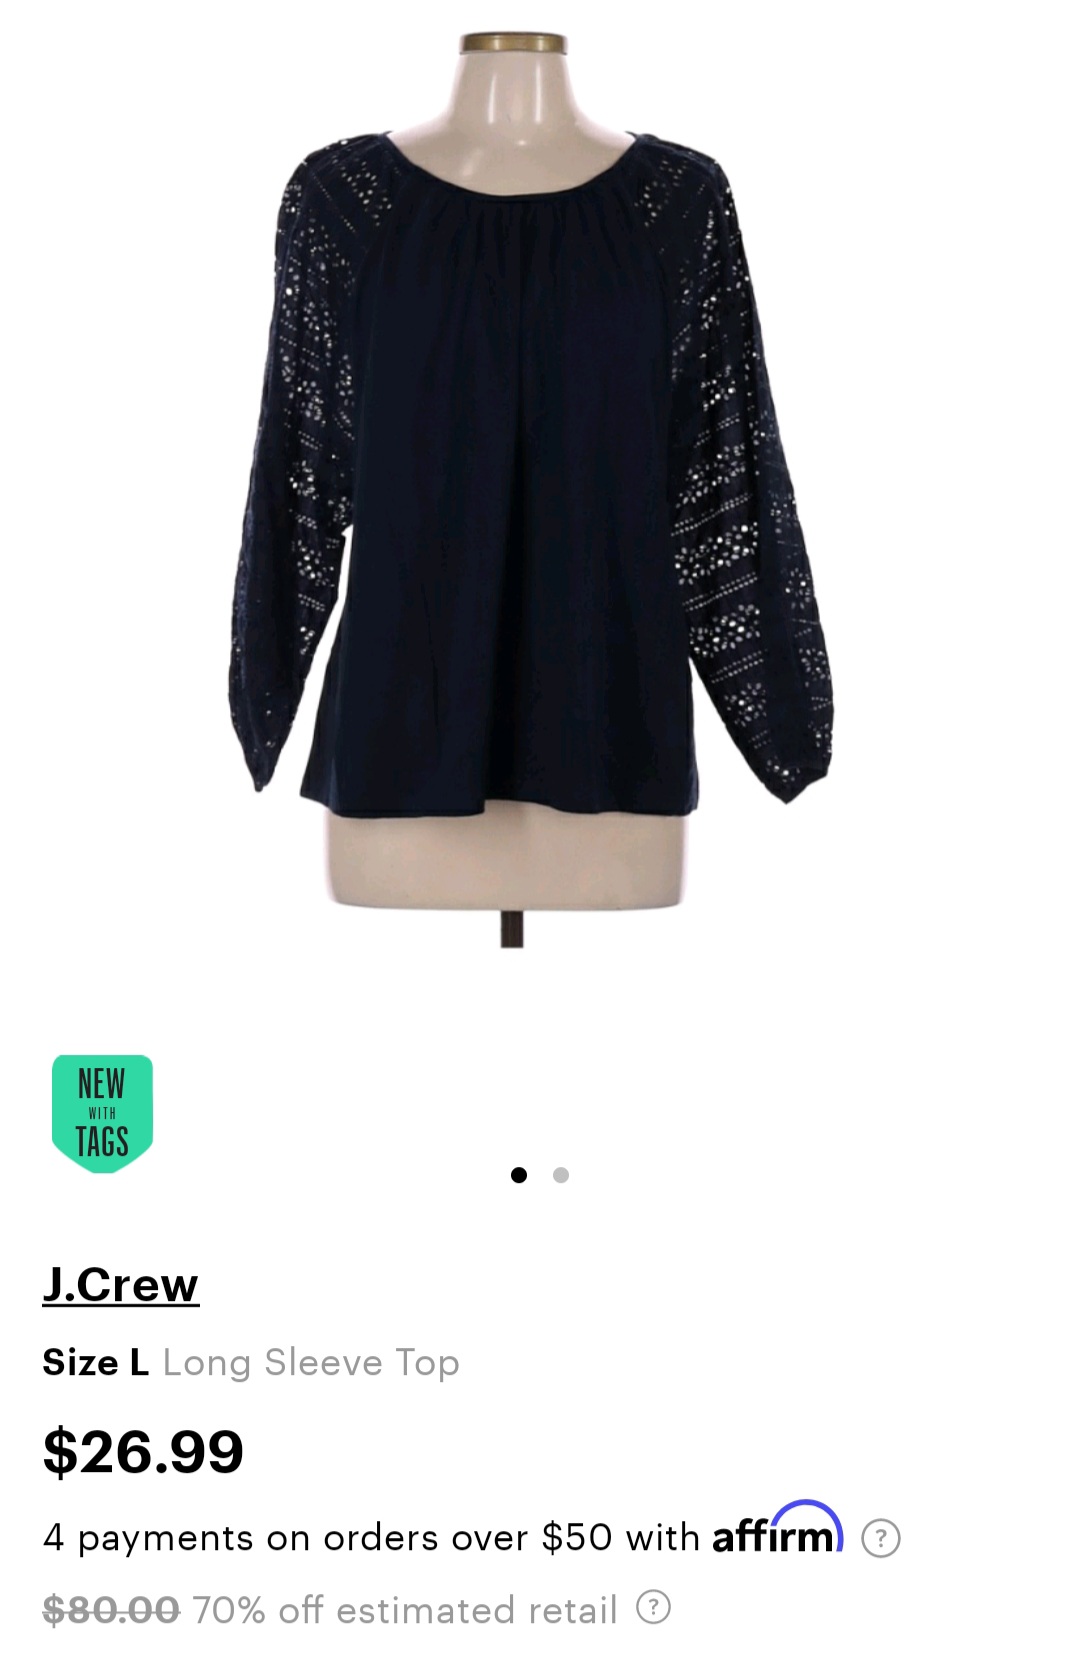
Sometimes you hit the secondhand jackpot. This thrifted and gifted outfit was the perfect trifecta: a) new with tags or like new, b) brand name/high value pieces, and c) super soft comfort. 

With this blouse, I love the voluminous airy sleeves and eyelet lace. The body is a heavyweight but very soft jersey knit. It feels like wearing pajamas, but the embellished sleeves and ruched neckline give it it a more polished look than your standard tee.  


This J. Crew blouse was new with tags from ThredUp, and was just $26.99 (vs $80 retail, a 70% savings).

I paired the blouse with a pair with Mugsy jeans. These had no tags but were like-new quality. These were free from Buy Nothing, and retail at a $108 value. Just like the blouse, these jeans are ultimate work-from-home cozy, but work-from-office cute. Even from the Mugsy website, they pride themselves on comfort: "With super stretch, breathability & cloud like softness, our high-tech Mugsy Denim is so comfortable you'll feel like you're wearing sweatpants."


I've always been nervous to wear navy tops. You aren't supposed to wear navy with black, but then you pair with jeans and you're all blue... we'll the good news about a monochrome base is you are then free to accessorize with bold prints and patterns. Add a dramatic floral scarf or a bright handbag. We ease into it here with a green striped belt. 


Between the blouse and jeans, this outfit cost $27 (an 84% savings off of $188 retail price). 

Going to work in total comfort? Winning!


Sunday, April 10, 2022

Empty Your Trash for Earth Month

It's time for an AUDIT!

OK, I know that word is scary during tax season, but it's also Earth Month. 

So this month, we're going to do a *trash* audit. 

Sometimes, you can make all these changes... reusable mug, reusable food storage, swapping dryer sheets for wool balls... and after all of that you don't know if you've made any impact. And if you're comparing yourself to the super zero-wasters whose trash fits in a single jar, you may start to get overwhelmed that it seems like an impossible task to reduce or eliminate your trash. Well, in order to know if you're making an impact, you need to know where you're starting from. 

A few years ago, I started collecting my recyclable plastics for an upcycling project. I assumed that the majority of my plastic waste was going to be the white plastic lids from Starbucks hot beverages, and after several months, I learned how wrong that was. Now, the first two types of plastic waste I made were indeed coffee-related :) but it was mostly my creamer bottles from home-prepared coffee. Point being, the areas of waste you think you have may not be the biggest opportunities in reality. 

First step: pick your full trash bin or recycle bin, and literally dump it out. You may want to prep first by bringing it outside and/or laying down a tarp! You may also want a pair of gloves. :) 

Next, start sorting the waste into categories. Is it leftover food, plastic, aluminum, vacuum lint, paper bills?

(photo from Brian Hoffman, Flickr, Creative Commons license)

Next, start dividing into subcategories. Is there a single source within a category? For example, my plastic waste was almost entirely creamer bottles, followed by dairy containers (ex. sour cream tubs). 

Identify your top 2-5 sources of waste.

Now what to do with this information? 

1) Stop worrying about everything not in those top 2-5 sources. Look at the pile outside those categories, is it less than 20% of your waste? You can make dozens of changes and not realize any major results if you focus on the the wrong ones. 

2) Make a plan for the top sources. I had you identify 2-5 for a couple reasons. Not only will these make up the majority of your trash can and be the most rewarding to resolve, but also, you can move on to the #2 or #3 item if the first one is hard for you to address. There may be items that you just need to cut yourself some slack on because you really love that thing or your life requires some convenience. 

To start making a plan, look to the R's, and in this order: 

  • Refuse/Reduce: Can you live without the thing altogether? Is there an alternative that creates less waste or packaging? For example, if you have a lot of beverage cans in your trash, are you able to switch to a tank system like SodaStream? If it's paper bills, can you switch to e-billing? Can you unsubscribe from junk mail or catalogs?
  • Repair: Is the item something that could be restored? If you are throwing away clothes or shoes, could they be fixed with some simple sewing or shoe polish? Or a visit to a tailor or cobbler? 
  • Reuse/Gift: Are the items something that can be repurposed? For example, if you are throwing away containers from lunch meats or takeout, they are equivalent to Gladware or similar food storage. If you have acquired too many to reuse yourself, have you posted to gift to a neighbor?
  • Rot: Synonymous with composting. Is the majority of your trash food scraps or leftovers? You don't have to have a home composting system for this, as some municipalities let you put your food scraps right in with your lawn and garden waste. If you are worried about smells or pests or leaky countertop bins, simply put your food scraps in a bag in the freezer. When the bag gets full, transfer it to your yard waste bin. The freezer will solidify any liquids and reduce the time it's in your bin. 
  • Recycle: I'll include trash and donate in this category. These are your last resort. Unless you have a charity or organization calling for specific types of donations, your thrift store drop-off may very well end up ultimately in the trash. 

After you've identified your top categories, chosen from those the ones you're most able and willing to address, and reviewed the questions above, you should end up with something like: "Wow, food waste makes up 30% of my trash. I'm going to Reduce by sharing meals when eating out and making a planned grocery list for when eating at home. I'm going to Reuse by intentionally eating my leftovers and using up leftover ingredients in the same week. And I will Rot the rest." 

Now you can save mental effort by focusing on one or two changes and having confidence you've made a substantial impact!

Sunday, April 3, 2022

Public Transit for a Better Vacation

T and I just got back from a week's vacation in San Antonio, TX, where we got some much needed rest and sun. 

We've got a pattern going where our first day in a new place we get on one of those hop-on hop-off tour busses. It allows us to get the lay of the land, get a little bit of narration, and get transportation to one or more of the notable spots. While it could be a bit too "touristy" for some folks, we've found it fairly economical, and a good way to get oriented with the major highlights.

After the first day, however, we tend to strike out more on our own. At one of the shops we stopped at, the store owner told us about a special bus route, called the "culture line", which would take us by a lot of the major attractions such as the art museum and botanical gardens. So we hop on the Via (San Antonio's bus service) website, only to discover that the specialty lines have been paused since COVID, but that the standard city busses will work well for us.

I was super impressed with the modern tech for navigating ticketing and the routes. They have an easy app to purchase and store your ticket, and you simply show the QR code to the driver to ride. For trip planning, you have a bunch of choices: 1) there's another app, 2) they are fully integrated with Google maps, 3) from any bus stop, you can text the bus stop number and get back a list of all the busses and their next 2 arrival times. 

We chose the weekly option, and at $12 each, it paid for itself on the first day. We headed to the botonical gardens, which would have been $12 + tip each way if we used Uber. (And this was our reward, for the short 8 minute walk from the bus stop to the gardens.)

We did similar trips throughout the week to restaurants or attractions, saving a total of about $96 vs Uber (and twice that vs Lyft). Take all those savings and do an extra river boat ride and order dessert every night!

Other benefits, of course, are vs cars, you are making the more eco-friendly option. Vs walking, you get a break for your feet and get to expand your radius of exploration. And finally, you tend to take more local streets vs highways and get to see more of the town. There were at least a few sights and restaurants we discovered because of travelling a different route or being dropped off on the opposite side of our destination. 


Sunday, March 20, 2022

Prom: the Second Time Around

I'm always down for a costume party. If you haven't caught on from my Halloween posts, I'll take any opportunity to dress up for a theme or as a character. So when my friend A texted that her friend was having a 90's Prom themed birthday party, and did I want to be her date, it was an easy yes from me. 

A couple years ago, my friend L had invited me to her daughter's princess-themed birthday party, and I acquired this dress, but didn't end up getting to go to the party. I was thrilled to have another chance to wear it. Somewhere between lilac and dusty rose, this tulle gown is not a color I would typically choose, but it's perfect to be a pretty princess or attend 90's prom.

The dress was new with tags, orignally $45 from Charlotte Russe, but just $15 at Goodwill.

To add to the 90's look, I added frosted lip gloss, fully lined and smudged eyes, and a deep side part with butterfly clips.

Of course, it wasn't the 90's without a choker, and I acquired this beaded choker at House of Vintage (SE Hawthorne, Portland) for $13. 

Not pictured is A's outfit. She went the more goth/grunge 90's route with a black spaghetti strap slip dress (thrifted from House of Vintage) and Doc Martens (borrowed). SE Hawthorne was a great street to make a day of shopping, featuring multiple vintage, thrift, and antique shops, ranging from clothing to furniture to housewares.

Overall, it was super fun to dance the night away, with the nostalgia of classic prom attire and music.

Dress: $15

Necklace: $13

Getting to relive prom: priceless

Sunday, March 13, 2022

Spotlight: Mama and Hapa's

I was down in Portland for a brief visit to wish my friend A a happy birthday, when we stumbled across this cute Zero Waste shop "Mama & Hapa's". I'm excited to see more of these types of shops cropping up, just going to show the idea of more eco-friendly products is becoming more mainstream, which in turn should make them more affordable over time. 

This store's emphasis is on refillable bath and body and household cleaning products. Check out this wall of dispensers, which is just about 1/4 of the total dispensers they have.

M&H simplifies the process of refilling for you. You no longer need to tare your container or risk paying extra for the weight of your container. They use RFID cards to activate the dispenser which also track the amount of product you dispensed. Then the card is scanned at the register for easy checkout.

These sample hair conditioners show the set-up. The digital display shows the price per unit ($.39 and $.53/oz). You set the RFID card on the little wooden block, and your jar underneath the spigot. I was pleasantly surprised to see how affordable these were. For reference, my prior drugstore L'Oreal conditioner is going for $.23 - $.80/oz, depending on how large a bottle you get, so these products are comparable with no packaging, and no need to buy in huge quantities to realize a good price.


Watch this to see how easy it is:


After sampling some of the lotion, I was impressed with the quality as well - it absorbed well, leaving my skin silky, not greasy.

Beyond the refillable liquids section, M&H carries several other sustainable alternative products, and again the prices are fantastic. These laundry and dish detergent pods are super competitive at $.25 each, compared to $.28 / pod for Tide Pods and $.31 / pod for Cascade + Dawn dishwasher pods. They have both unscented and scented versions.


No packaging doesn't mean no labeling. Each product has a small paper slip you can take with directions and indegredients.

Don't have a container to use? Take from their free stash! Have 30 jars collected that you want to give a second life to? Donate for others to use!

Want to transfer your product from that spaghetti sauce jar into your decorative pump? They have a small funnel for that!


M&H also sells some other sustainable goods like swedish dishclothes, travel utensils, reusable straws, and bamboo toothbrushes.

Check them out at mamahapa.com or 2 locations in Portland, OR.


Sunday, March 6, 2022

DIY: Sewing Kit

As we approach spring, I've been doing several cleaning, decluttering, and reorganizing projects around the house, and of course I've come across several items I've kept "just in case" I came up with a project. So time to keep myself honest! 

I came across this easy tutorial for creating a pincushion from a mason jar, and decided to give it a whirl. (Click the link if you want additional directions or examples.)

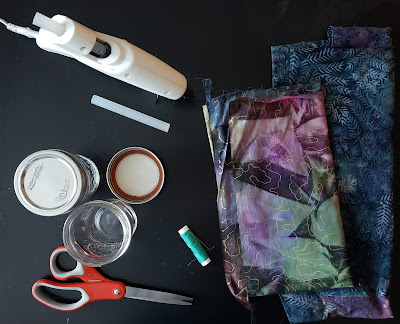
First, I gathered my supplies (Cost - $0)
  • scraps of fabric (each pincushion will need a 6" square). Do you leftover fabric from making COVID masks, or quilting? If you aren't a sewer, do you have a work shirt or bed sheet that needs to be retired? The only requirement is that the fabric not be super thick, or you'll struggle to close the jar lid again. 
  • a mason/canning jar. This project requires the ring and lid style, so any random jar won't do. I used a jar from a previous jelly making experience.
  • quilt batting. I'll be honest; I kept the stuffing from a toy my dog destroyed. 😆
  • small scrap of felt or cardboard (2-3" circle). Also reused from previous craft projects. This is my 3rd time reusing this same felt. Most recently it served at part of a Halloween costume.

And tools: 

  • scissors
  • glue gun or fabric glue 
  • needle and thread

This is a beginner level project with no sewing skills required!

First, I'm cutting a 6" square out of my fabric. I like these water soluble pencils you can get at the craft store to mark your fabric, but none of our edges will show, so feel free to use any marking device. We're going to end up rounding the edges to make a circle. This project doesn't require an exact pattern, so feel free to free-hand it. If that makes you nervous, print and trace this 6" circle. Note: this pattern works for the smaller mason jars. If you have larger jars, you will likely need a larger circle.

Next: you're going to do a simple stitch around the edge of the fabric. Again, don't worry about being too precise. My stitches we're between 1/8" and 1/4". (The thread color also doesn't matter; the stitches will be hidden.) You'll leave the beginning and end of the circle as loose threads. When you start to pull on these tails, the circle will start to gather into a pouch.

Fill the pouch with your quilt batting. 

Next, insert the inner lid portion into the pouch. (The white you see below inside the pouch is the lid. I show a second lid beside it for reference.) Draw the strings tight, and tie them together in a knot.

Your felt or cardboard circle should be smaller than the lid center. You can trace the lid and then cut a little smaller. Glue it in place to cover the opening of your pouch and cover the stitching.

Push the poufy, quilt-batting-stuffed portion through the ring of the lid, so that the lid lays flush with the ring.

Fill your jars with any small sewing pieces (ex. buttons and bobbins), screw the lids back on, and use your new padded tops as pincushions.


Not only have you used up and upcycled your jar and fabric scraps, but you now also have storage to collect all these stray small notions. 


I was pleased with how easy this came together, and that it will help organize my increasingly messy craft room! These would also make a cute gift for crafty friends.