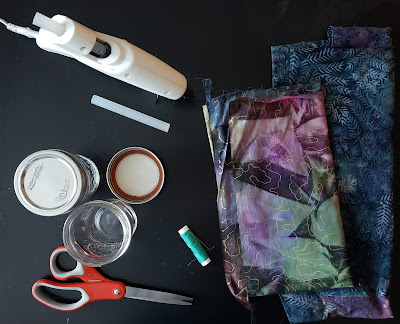
- scraps of fabric (each pincushion will need a 6" square). Do you leftover fabric from making COVID masks, or quilting? If you aren't a sewer, do you have a work shirt or bed sheet that needs to be retired? The only requirement is that the fabric not be super thick, or you'll struggle to close the jar lid again.
- a mason/canning jar. This project requires the ring and lid style, so any random jar won't do. I used a jar from a previous jelly making experience.
- quilt batting. I'll be honest; I kept the stuffing from a toy my dog destroyed. 😆
- small scrap of felt or cardboard (2-3" circle). Also reused from previous craft projects. This is my 3rd time reusing this same felt. Most recently it served at part of a Halloween costume.
And tools:
- scissors
- glue gun or fabric glue
- needle and thread
This is a beginner level project with no sewing skills required!
First, I'm cutting a 6" square out of my fabric. I like these water soluble pencils you can get at the craft store to mark your fabric, but none of our edges will show, so feel free to use any marking device. We're going to end up rounding the edges to make a circle. This project doesn't require an exact pattern, so feel free to free-hand it. If that
makes you nervous, print and trace this 6"
circle. Note: this pattern works for the smaller mason jars. If you have larger
jars, you will likely need a larger circle.

Next: you're going to do a simple stitch around the edge of the fabric. Again, don't worry about being too precise. My stitches we're between 1/8" and 1/4". (The thread color also doesn't matter; the stitches will be hidden.) You'll leave the beginning and end of the circle as loose threads. When you start to pull on these tails, the circle will start to gather into a pouch.

Fill the pouch with your quilt batting.

Next, insert the inner lid portion into the pouch. (The white you see below inside the pouch is the lid. I show a second lid beside it for reference.) Draw the strings tight, and tie them together in a knot.

Your felt or cardboard circle should be smaller than the lid center. You can trace the lid and then cut a little smaller. Glue it in place to cover the opening of your pouch and cover the stitching.

Push the poufy, quilt-batting-stuffed portion through the ring of the lid, so that the lid lays flush with the ring.

Fill your jars with any small sewing pieces (ex. buttons and bobbins), screw the lids back on, and use your new padded tops as pincushions.


No comments:
Post a Comment