Thursday, December 5, 2019

Cardboard Creations

Whether you are crafty or want a fun activity with your kids, there are tons of cute crafts using toilet paper cardboard cores. All you need to do for inspiration is Google "TP roll crafts". Just a couple examples:
12 Crafts from Country Living
195 Pins from Pinterest

Not to mention there are dozens of tutorials on YouTube, and even folks selling the tubes on Etsy and Amazon!

The good news is, you have this free craft supply in your home already. You can also use paper towels cores or wrapping paper tubes.


I decided on creating some festive winter snowflakes and poinsettias. For each, you'll need 1-2 TP rolls or 1 paper towel roll. You will cut a TP roll into 6-8 strips or just over 5/8".

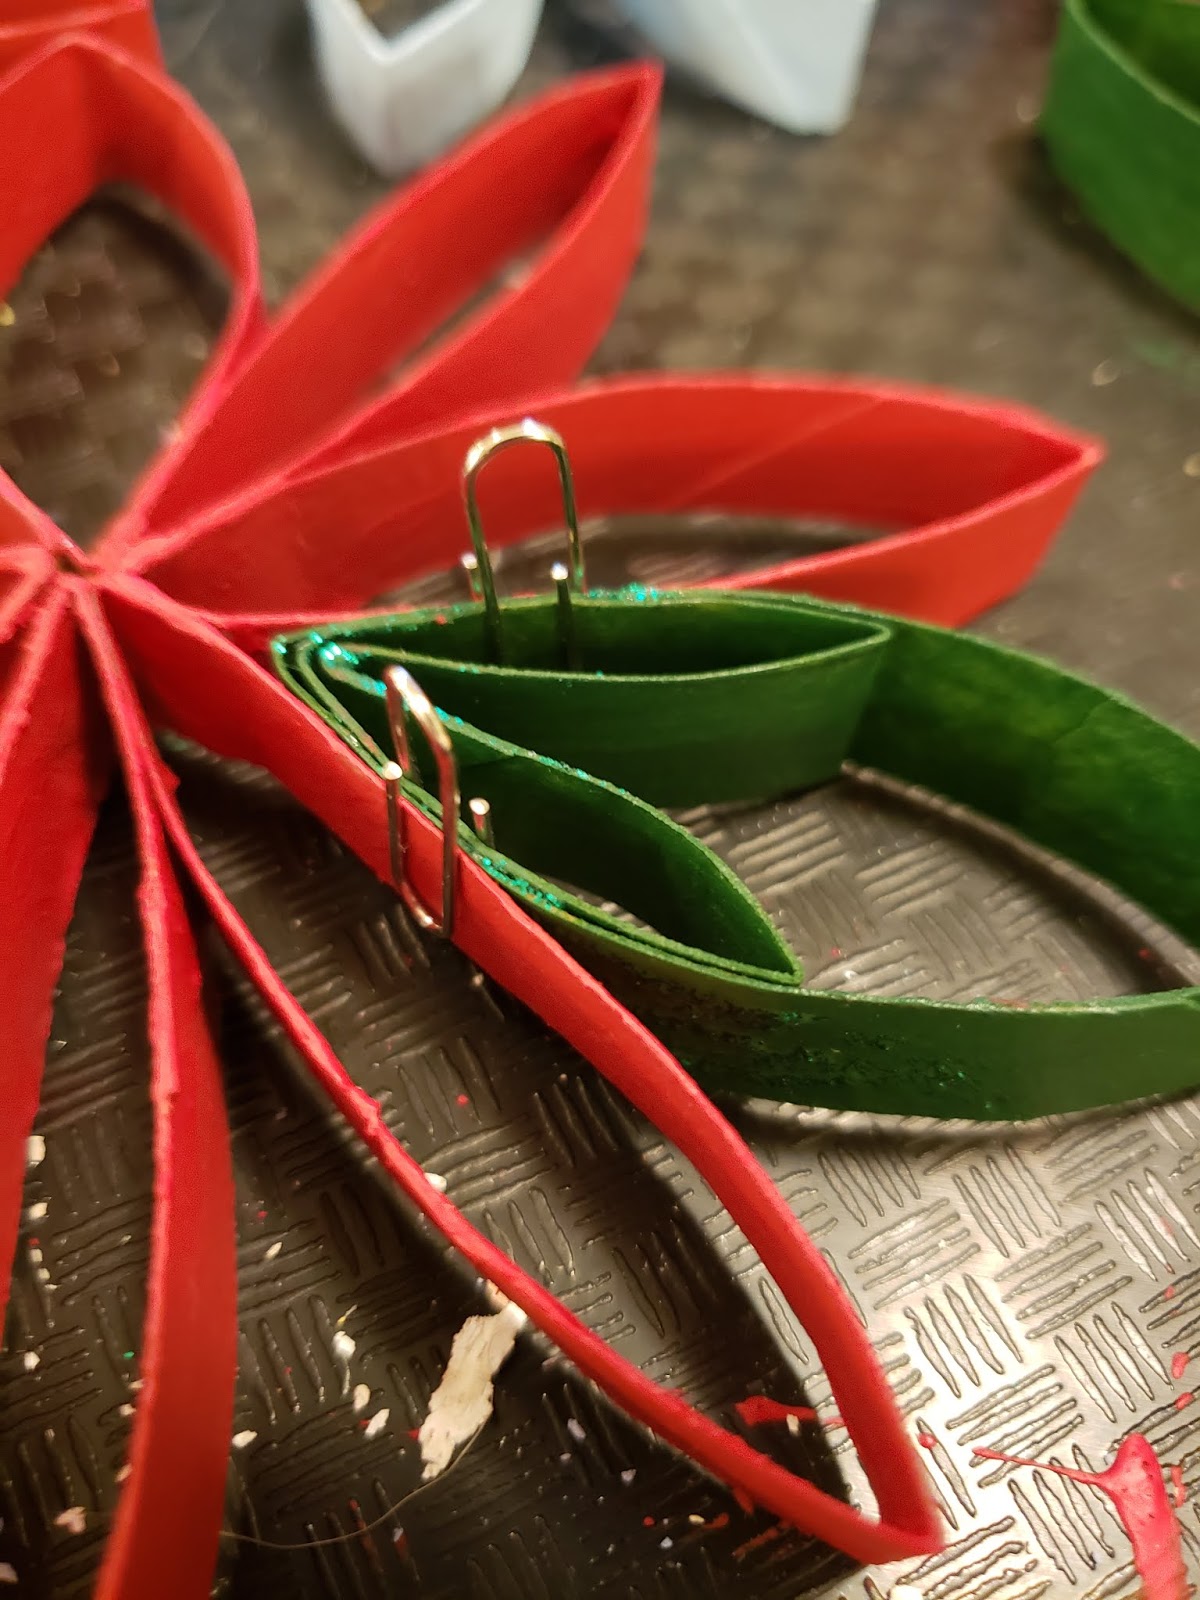
On the left of this picture I show the roll cut into 8 strips; at the top is the 8 strips glued together and clamped at one end; on the bottom right is what the glued strips look like when un-clamped.


Once un-clamped, glue the first and last strips together to form all strips into a circle shape. You just need a little glue on each strip to connect them. Too much, and the "petals" won't fan out. 


Now that you have a circle of petals, you can both paint the cardboard (I used red for poinsettias and white or light blue for snowflakes) and start to embellish your design with additional strips. See the strip folded in half to create a leaf for my poinsettia or add layers to my snowflake. Feel free to experiment - after all, all snowflakes are unique! Glue and use paper clips to hold in place while the glue dries.


Once you are happy with the shape, line the edges with glitter glue, or dip in glitter!


What do you do with you new lovely creations? Decorate your tree or mantle:


Or embellish a gift bag:


Or use instead of a bow on a package: 


In the spring, mix it up with different colors to create different types of flowers.

Your supplies cost is cheap or almost free. The cardboard is free, and paint and glitter can be acquired from:

  • a neighbor via Buy Nothing or Freecycle
  • your local thrift store. Most have some art supplies in their housewares section. 
  • art supply-specific reuse stores like Seattle ReCreative

Friday, November 29, 2019

Slow Cooker for Savings

What a *feast* we had for Thanksgiving! After cooking and eating almost a dozen dishes, I wasn't up for much more work. This is when you put your slow cooker to work.

No matter how well you carve that turkey, there is much more left than you realize. Simply put the carcass (bones, skin, and all) in your crock pot, set on low, and forget overnight.

I say "simply", but this does take some effort, especially if you have a too small crock pot like mine. You need to bring some muscle, some skill or a friend to squish that carcass into the crock pot. Fortunately, my mom has this move we like to call "Hulk, smash!" where she crushes that turkey with her bare hands, and now you can fit the whole leftovers of a 16lb turkey into a round crock pot.

Now, just add a little water or chicken broth, turn on the heat (I do low for 8 hours), and leave it while you sleep. If your crock pot's like mine, and goes into warming mode after the cook time is complete, it will be too hot for you to process right away. Turn it off while you eat some leftover pie for breakfast, so it can cool down a bit.

Look at all these glorious turkey bits!


You'll need to spend some time sifting through the pot to remove the skin and bones, and there may be some tiny little bone fragments. But a little bit of patience pays off! That skin and bones makes an amazing rich, gravy-like broth; I was left with a whole quart. I started with a carcass from a 16lb turkey, that was fairly well carved, and still ended up with 2 1/2 pounds of meat falling off the bone. Some pieces will be sizable and good for sandwiches; some will be smaller and good pot pies, soups, or turkey enchiladas. At the end of this process, I had less than half a small compost bag of waste.


Making the most of your turkey? About ~$12 value.
Watching your mom "hulk smash" a turkey? Priceless.

Thursday, November 21, 2019

The Best Things in Life Are Free

Walking through the Detroit airport, it looks like they are newly installing water bottle refill stations. Way to go, Detroit!


Now, after dumping your liquids before security, you don't need to choose between trying to fill your bottle from a drinking fountain or paying $3+ for a plastic bottle of water. You can also be proud knowing you are part of the solution by not contributing to the 483B (like *billions*) water bottles used in 2019.


(Detroit is also using the stations to call attention to the importance of fresh tap water, and the partnership between Delta and the airport to support youth who are leading a water-testing initiative in Flint. Learn more here.)

Now, if you've been living under a rock like me, you missed that both Sea-Tac airport and Portland airport also have refill stations, and have since late 2012!

While this is particularly convenient when you are limited liquids and hostage to high airport prices, you can also benefit from refill stations in everyday life. Check out these resources to find water near you when you're out and about: 

Tap app Android iOS
In their own words, "Tap’s Refill Station network is partly made up of partnerships with coffee shops and fast-casual restaurants, while also showing you best public places to refill your water bottle around the world."

RefillMyBottle app Android iOS
In their words, "RefillMyBottle is an online map that identifies all the places - be it a cafe, resort, museum or shop - where refillers could walk in and fill up their bottle with clean drinkable water for free or a minimum fee."

Stay hydrated, friends!

Sunday, November 17, 2019

Mend Around Mildew

I have a fabric shower curtain liner that I love, because you can easily throw it in the wash. Inevitably, however, mildew and pink minerals stain the curtain, especially at the bottom hem.

My gut reaction is "Ew! Throw it away!" But if you have a sewing machine, you can quickly hem the shower curtain even faster than going to the store for a new one.

First, cut off that moldy hem (yuck!). The thick plastic strip inside that weights the bottom of the curtain is also stained, so I'm not trying to save that.


Next, fold the cut bottom of the curtain up about 1/2" (the width of the foot on your sewing machine) and sew the length of curtain. Fold again, and sew again, to hide the raw edge where you cut. This is the easiest hem, with just a long, straight line to sew.


Since we threw away the weighted strip from the bottom, we can optionally add weight by sewing buttons periodically across our new hem. I have tons of these collected from the "spares" that are sometimes included with sweaters.


My new hem only raised the bottom of the liner about 2", so it still falls below the edge of the tub by several inches. I could repeat this process a few more times before shortening the liner too much, giving me years more life out of it.


About 10 minutes of work saved me $10 on a new shower curtain liner. I like that hourly rate!

Tuesday, November 5, 2019

Cash for Costumes

As you've seen by now from previous years' posts, I love a good Halloween costume, and I enjoy trying something new each year. The average pre-packaged costume costs about $60, is poorly constructed, uncomfortably polyester, and comes in difficult sizes like S/M. From swapping (that time I was a chicken) to thrifting (Eleven) to DIY (Ursula), you can enjoy some really creative looks that are more tailored to you and more original.

This year, my friend Anna inspired me to be a rock lobster, of the B-52s song. Due to the "unique" needs of the costume, I was able to purchase some items used while some were new.

I was pretty happy with the end result:


Ideally, I would purchase used, wear it, and then re-donate it or sell it, meaning the item gets maximum usage from people before and after me. I write frequently about how buying used saves me money up front, but I haven't talked about how much you can recoup from selling items.

Just a few days after Halloween, I've already sold 2 pieces of my costume, made back $25, and I'm not done yet! I highly recommend giving this a try, especially for those pieces you don't envision re-purposing for other costumes. I sold these on Facebook marketplace. Other online choices include Poshmark, thredUP, and Swap.com, and of course, there are local brick and mortar shops. Each varies in model: some you can sell your items directly to the store, while others will pay you when the item sells, while others you do the work of selling and they simply give you a place to list. The amount to be made is directly proportional to the effort you put in; that is, the more work the store does, the higher their commission.

Here are some of the key pieces of my costume:

1. Fierce rocker boots. Retails for $36 new, purchased for $22 used, resold for $15. Total cost $7/savings $29.

2. Shredded pleather leggings. Cost $20 new, resold for $10. Total cost $10/savings $10. 

3. Calvin Klein silver leather jacket. This one is a keeper! Retail cost $160, bought used for $34, savings $126.

Total savings: $165. $140 from purchasing used, and $25 recouped from resale.

While I love selling for costumes, which are typically more "disposable" than other types of clothing, don't limit yourself. Selling is a great option for any items that still have life in them.

Sunday, October 20, 2019

Lose Your Lint Roller

My cat, Toby, likes to lay in our windowsill, which leaves a thick coat of hair inside our curtains - yuck!


Enter the standard sticky-paper lint roller. It takes two sheets just to clear a 4"x6" area, or 30 sheets to clean the whole panel. 

     
 Enter the lint brush. 


This particular lint brush is self cleaning. Simply toggle the button on the back side, which cleans the hair into a reservoir; it holds about 10 sticky sheets worth of hair, which saves you wrestling with tearing off multiple sheets.

When you're done, just dump the reservoir! 


You can find self-cleaning lint brushes for $9.
Or, dual-sided lint brushes for $6.
Or, sticky sheet rollers in multiple pack sizes, average $.05 per sheet.

Assuming you use 2 sheets a day for clothing, and 100 sheets per year for larger surfaces like couches and curtains, you would spend $41.50/yr on sticky rollers.

With a self-cleaning brush, you'll save $32.50 in the first year, 850 sheets of paper and plastic handles. 

Now you can spend that money on extra treats for your fur babies.


Wednesday, October 2, 2019

Reduce, Reuse... Reforest?

Most of my posts, and many of the conversations I hear, are centered around 1) how do we prevent waste or 2) how do we reuse the resources we've already generated?

Both are valid (and let's do that!), but let's also consider another angle: corrective action.

By adding more plants and trees, we can:
Replace what we've removed and compensate for the carbon dioxide we create just by breathing.


Per 8 Billion Trees, in 50 years, 1 tree:
  • Creates $30,000 in oxygen
  • Produces $35,000 of recycled water
  • Removed $60,000 of pollution from the air
Here are some ways to participate:

1) Get a houseplant, or 10! Did you know that NASA did a study recommending 1 plant per 100 sq ft to purify the air?

2) Switch your home or office paper to FSC Certified paper. This means that is is recognized by the Forest Stewardship Council as being sustainably harvested. They do other cool things like protect indigenous lands and old growth forests.  Just look for the green FSC tree logo.


3) Shop from companies that have a mission to plant trees. 8 Billion Trees is just one example of many companies that sells gift items like charm bracelets, reusable tote bags, and metal water bottles, while planting trees with the funds. Another example is Trinity Oaks who plants a tree for every bottle of wine purchased.

4) Get inspired by mass scale projects around the world. Like the Ethiopians who planted 350 Million trees in 12 hours, as part of an ultimate goal of 4 BILLION trees. Or the Indians who planted 220 Million trees in a day.

5) Then, plant trees yourself. On November 2nd, you can join others in the Seattle area to plant in 17 parks as part of Green Seattle Day. Or find many other dates and locations for events at One Tree Planted.

6) Get your company's support! Ask them to donate 2000 trees as part of a 1 Million tree effort to support reforestation after California's hard wildfire year.


Let's get to rebuilding! Or at least buying a houseplant. :)

Saturday, August 31, 2019

Simple Syrup is Simple

I love me some flavored syrups.  I'm a year-round iced coffee drinker. We already have the iced coffee part figured out: we brew a regular pot of coffee, let it cool to room temperature, and store it in a pitcher in the fridge.

Now for the sweetener. The Torani and Da Vinci syrups are very easy to make, especially the "classic" or "cane sugar". (Want simple syrup for your cocktails? It's the same thing. Shhh...)


These bottles run you about $8 at the grocery store or $5 at a specialty restaurant supply store. Making it at home? Costs about $0.60.

If you like, buy the syrup the first time and use this recipe for refills. I like the bottle because I like the pump (sold separately for about $5); alternatively you could just use a jar and measuring spoon. A single pump is a 1/4 oz = 1/2 tbsp or 1 1/2 tsp.

Here's the recipe:

Equal parts sugar and water. That easy. To fill the whole bottle, use 2 cups sugar and 2 cups water. Heat in a small soup pan to boiling and cook for a few seconds until the sugar dissolves. Remove from the heat and let cool to room tempertaure. Use a funnel to pour into the bottle.

Cooking time? Less than 10 minutes.

If you want, you can make flavors with fruit peels, herbs, extracts, and more. Hearty additives like orange peel can be added at the beginning. More fragile additives like mint leaves can be added as the syrup is cooling. Pull out or strain any pieces before bottling. Note: the pieces can be their own happy product (see my post on candied orange peels.)

Result: yummy syrups for 10% of the retail cost and you save a bottle!


Thursday, August 22, 2019

No-sew, T-shirt Tote

This is one of my favorite t-shirts. The concert was awesome and we went with dear friends. However, I also love cooking and eating greasy foods, so after a few years of abuse, it was ready for a new life.


There are MANY tutorials for making no-sew t-shirt totes, and I wanted to give it a try. I used this one as an example, if you prefer video tutorials. All you need for the project is a pair of scissors.

First step, cut off the sleeves. The arm holes will become your bag handles.


Next, cut the neck hole wider. This will become the opening of your bag. I was careful to cut from the back of the t-shirt, because the design was printed fairly high up of the shirt. Feel free to do a deeper scoop if it doesn't mess up the pattern on your shirt.


Now, move the bottom of your shirt and cut fringe, about 1/2" strips and 3" long. Where your fringe ends will be the bottom of your bag. I didn't need that deep of a bag and wanted to trim off some of the grease stains, so I first cut off the bottom 4" of the shirt.


At this step you have a choice: I wanted my seam hidden, so I will complete this step with the shirt inside out. If you like the look of fringe, leave your shirt right side out. Tie the fringe together in knots (front of shirt to back of shirt) to close up the bottom seam.


Now. just tying front to back will leave gaps between each knot. So we will do a second row of knots, this time tying the top strip of one knot to the bottom strip of the knot next to it. This will close the gap between the two. Do a double knot on this round to make it solid.


When you are done with the knotting, flip your shirt right side out, and now your fringe is hidden in the bottom of the bag. With all those knots, this bag is surprisingly sturdy.


Voila! A free rockin' tote bag, an a second life for my fave concert tee.


Thursday, August 8, 2019

DIY Gift Planters

Today I'm crafting out of my recycling. I'm propagating succulents *crosses my fingers*, and I want to put them in some cute little planters. All we need:
  • Jars: I'm using Tostitos salsa and cheese dip jars. You can't keep me away from my cheese dip!)
  • Cute paper: check out Seattle Recreative for leftover scrapbook or wrapping paper, use a cute shopping bag, or magazine cutouts. I'm using the wrapping from "Who Gives a Crap" TP, which has infamously cute seasonal wrapping. 
  • Mod Podge or other craft glue
Dear friends, I only write about products or tips that I've tried and loved. Therefore, I will not tell you about "Who Gives A Crap" toilet paper. It is my punishment for ordering a case of 48 rolls that I'm making myself finish it myself (T and guests refuse to use it). However, a side result is that each roll is wrapped in really cute paper, so yay, free crafting material. ;)

1) Gather your supplies. You'll need scissors and a brush or sponge applicator in addition to the supplies above.

2) Measure and trim your paper to a size that will cover your jar. Mine needed about 1/3 sheet per jar.


3) Apply an even layer of adhesive to the back of your paper.


4) Wrap around your jar so the ends neatly overlap, and apply a coat of adhesive to the outside of the paper too. This will give a nice seal, so it won't get ruined when you water your plant.


5) Don't worry if it's a little wrinkly. As you can see, the drier jar on the left looks smoother than the wetter one on the right. Any remaining "flaws" are just evidence that it's DIY.


6) Plant your succulent and enjoy!


Sunday, August 4, 2019

SIY (Start It Yourself) Succulents

I saw a short video the other day on "clever plant hacks", and today am testing one of them for myself.

The idea is that you can propagate many new succulent plants from:
  • the leaves of an existing plant 
  • a plastic bottle
Step 1: pull several of the leaves off a succulent.

Step 2: take a plastic bottle (I'm using an orange juice jug) and cut several small holes up and down the sides of it, stopping at least 2" from the bottom. 

Step 3: pour 2" water in the bottom and screw the lid back on.


Step 4: insert the cut side of a succulent leaf into each of the holes.


Put into your window, and hopefully in a few weeks, you'll have roots on each leaf, resulting in about a dozen new little succulents!

I'll post again in a few weeks - if succussful, I will have:
  • saved $4 per plant
  • saved a small plastic pot per plant
  • reused a plastic jug
Happy propagating!

Saturday, July 20, 2019

Prime Packaging

Did you do it? Did you cave and go nuts on Prime Day? Does your porch look like this??


Never fear. So did I. And you don't have to fill your recycling bin with all those boxes. And you *can't* fill your recycling bin in most municipalities with bubble envelopes or that plastic pillow padding.

First choice - reuse! One medium sized moving box at U-Haul costs $1.50 and and you'll pay up to $5 for the same size at less economical places like Office Depot, so it's nuts to only get a single use out of them. If you don't have a use yourself, offer them up to a friend, neighbor, or free site.

reuse
Medium-large boxes, plastic and paper filler material are great for moving and seasonal storage! Small boxes and bubble mailers were my biggest surprise that I was able to find neighbors who wanted them, but they're great for people with small businesses or who like to mail gifts.

recycle
Have you heard of Ridwell? Ridwell is a Seattle-area company designed to compliment your regular recycling - with packages as low as $10 per month. They take all sorts of items like batteries, light bulbs, thread, styrofoam and plastic film. Plastic film includes both those padding pillows as well as many plastic packaging wrappers.

Ridwell is doing a free pickup of Amazon packaging 7/22-8/1 to help with Prime Day specifically!

upcycle
I'm still in love with this cat castle.


We'll see if I can get T on board. ;)

Saturday, July 6, 2019

Shoe Sister

Remember when you were younger and had a bestie or roommate, that you were lucky enough to wear some of the same sizes? And you would share clothes or shoes and automatically double the size of your closet?

Let's bring that back! You're never too old to have a wardrobe buddy. For me, I'm lucky to have an aunt who's a stylish gal, and likes to give me some of her hand-me-downs. A recent closet cleanout meant that I could be the recipient of some sweet summer shoes:

bøc sandals, compare at $50 new.


Crocs sandals, compare at $30 new.


Born sandals, compare at $80 new.


Overall savings $160, and I have some great comfort sandals to take me through the next couple summers. Thanks, Aunt Tricia!